Course: Biotope - Cumulative IMPacts of invasive ALien species (CIMPAL) version | LifeWatch ERIC Training Platform

  • Biotope - Cumulative IMPacts of invasive ALien species (CIMPAL) version

    What this tutorial is about
    This tutorial will guide you during the use of the CIMPAL (Cumulative IMPacts of invasive ALien species) version of the Biotope vulnerability Workflow, which assesses the habitat vulnerability to the introduction and establishment of Invasive Alien Species (IAS) and the cumulative effects of their negative impacts. The tutorial will clarify how to prepare the input data, as well as the step-by-step use of the workflow.

    About the workflow
    You can access the workflow through My Lifewatch Platform at  https://my.lifewatch.eu under LifeWatch ERIC Products/ LifeWatch VREs/ Biotope/  Run a new workflow/ CIMPAL.
    For further information regarding the overall initiative that leaded to the design of the validation cases and the development of the workflows, please consult  the LifeWatch Internal Joint Initiative dedicated platform: https://www.lifewatch.eu/internal-joint-initiative/workflows/.

    Get in touch with the scientific team

    Heliana TeixeiraHeliana Teixeira, CESAM Centre for Environmental and Marine Studies, Biology Department, University of Aveiro


    Julien RadouxJulien Radoux, UCLouvain 

  • Open all

    Close all

  • steps for biotope cimpal version

    The user must prepare a set of files before running the workflow. These files can be uploaded previously in the “personal space”, or in each step of the workflow.

    1. Occurrences Dataset: Dataset of species occurrences. It should be a .txt file contained within a .zip file with TSV (tab separated values), up to 6 columns, and its first row should contain the following column headers:

    • decimalLatitude (numeric): the latitude of the observed specimen expressed in decimal degree in WGS 84 coordinate system (EPSG:4326) 
    • decimalLongitude (numeric): the longitude of the observed specimen expressed in decimal degree in WGS 84 coordinate system (EPSG:4326) 
    • scientificName (text): the scientific name of the species
    • year (numeric): the year of the observation

    2. Alien Taxonomy Dataset: List of alien species scientific names. It should be a .txt file contained within a .zip file with TSV (tab separated values), with 2 columns, and its first row contains the headers:

    • scientificName (text): the scientific name of the alien species
    • dispersionRadius (numeric): a species potential daily range (as an individual trait, not an observation property), expressed in meter. A default value of 50 meters is used if the field is not provided.

    3. CIMPAL paths of introduction: Paths of introduction for each NIS taxa. It should be a .csv file (with TSV) in a matrix format with the first column listing the pathways of introduction categories and the subsequent n columns headers (first row) being the alien species scientific names <scientificName1>, which must match the names in the input file used in Alien Taxonomy Dataset Uploader (field scientificName):

    • row names (column 1) (text): “SpSciName”; “ALL”; <path1>; <path2>; <path3>; …
    • column headers (column 2 to n+1) (text): <scientificNameA>; <scientificNameB>; <scientificNameC>; …
    • (matrix cells) binary value (0/1) (integer): indicates if the pathway of introduction applies (1) or not (0) to a given alien species. In row ‘ALL’ always indicate (1): this will allow you to generate the cumulative CIMPAL index for all species, not filtered by pathway of introduction.

    4. Weight file: List of values of impact for each taxon inside of each biotope. It should be a .csv file (with TSV) in a matrix format with the first column listing the alien species names scientificName and the subsequent n columns’ headers (first row) being the n habitat names <habitatname>. These names must correspond to the names of each spatial layer uploaded in as Biotopes shapefiles and must be written in lower case. The cells in the matrix correspond to the value of the Magnitude of Impact (MoI):

    • (column 1) scientificName (text): the scientific name of the alien species must match the names in the input file used in Alien Taxonomy Dataset Uploader (field scientificName)
    • (row 1, column 2 to n+1) <habitatname> (text): the habitat names (lower case) must match spatial layers habitat names in input files 5 Biotopes.zip (<habitatname>)
    • (matrix cells) (integer): score of the Magnitude of Impact (MoI) of each species in each habitat, according to the scoring protocol adopted by the user.

    5. Biotope shapefiles: Spatial layers for each habitat. It should be a set of shapefiles contained within a .zip file. Each file should be named as single_<habitatname>.shp (write all habitat names in lower case). Please make sure that the names in the shape file match the names in the weight file. Project the habitat shapefiles in LAEA (EPSG:3035).

    6. Zones shapefiles: Spatial layer(s) for aggregating results. It should be one or more shapefiles contained within a .zip file. The zone shapefile must be in LAEA (EPSG:3035), and it must also contain a numeric field named "id_habitat" identifying each zone (unique zone code 1 to n).  

  • The Workflow is accessible on the web-portal of LifeWatch, using the link https://www.lifewatch.eu/internal-joint-initiative/workflows/
    Here, select the ‘Biotope’ workflow. Several login options are available, including LWOS (LifeWatch), Google, or EGI / EOSC credentials (Fig. 1).

    Login interface. The user can access the workflow using LWOS (LifeWatch), ORCID, Google.

    Fig. 1. Login interface. The user can access the workflow using LWOS (LifeWatch), Google, or EGI‑EOSC credentials.

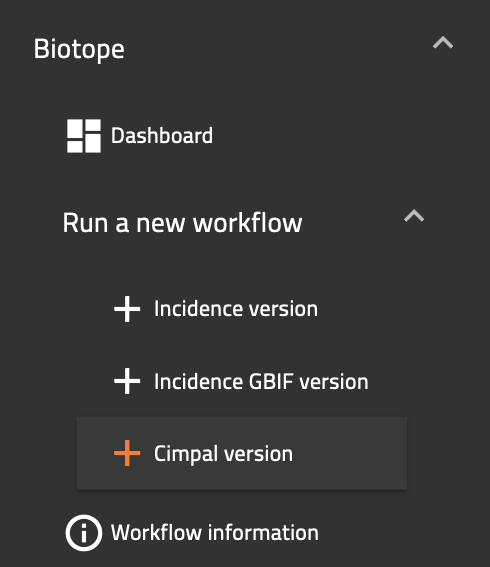
    This will route to your personal space on the Tesseract, opened on the workflow information page. On the left side panel, you will find the available workflows. The Biotope vulnerability Workflow is currently available in three versions (Fig. 2):

    a) the Incidence version

    b) the Incidence GBIF version 

    c) the Cimpal version.

    In the Dashboard you will find the status of your workflows.

    Both Incidence versions have dedicated tutorials and will not be further discussed here.

    Under the dropdown menu, you will also find a link to the Workflow information. At any moment, in the lower right corner, there is a shortcut (an orange attention icon) to e-mail the development team.

    Access links to the Biotope workflow versions, available on the left side panel.

    Fig. 2. Access links to the Biotope workflow versions, available on the left side panel.

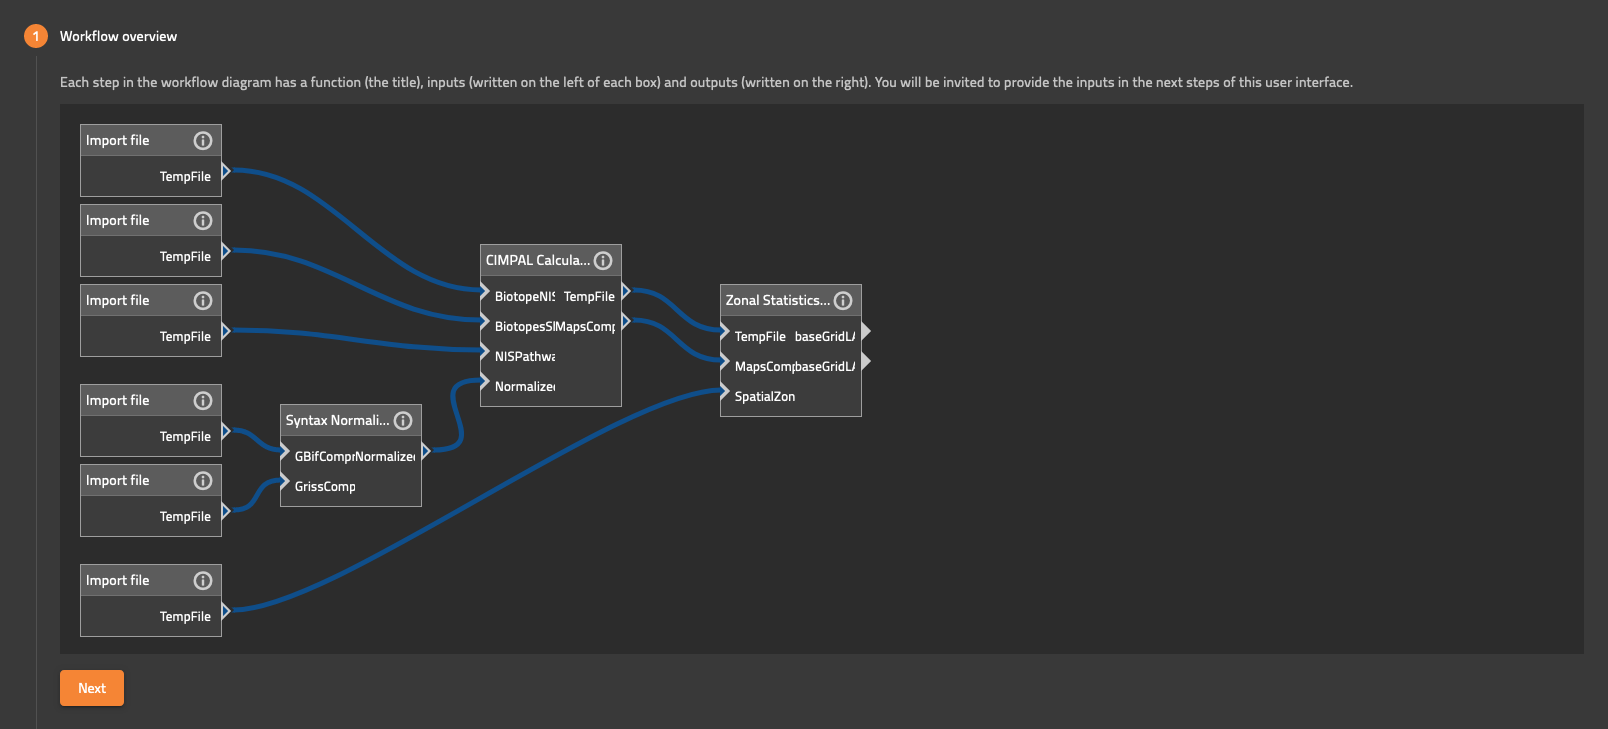
  • Once you have chosen the CIMPAL version of the workflow, you will be redirected to the workflow overview, where you will find the workflow schematics (Fig. 3).

    CIMPAL workflow overview

    Fig. 3. Workflow overview

    To advance, please press ‘Next’.

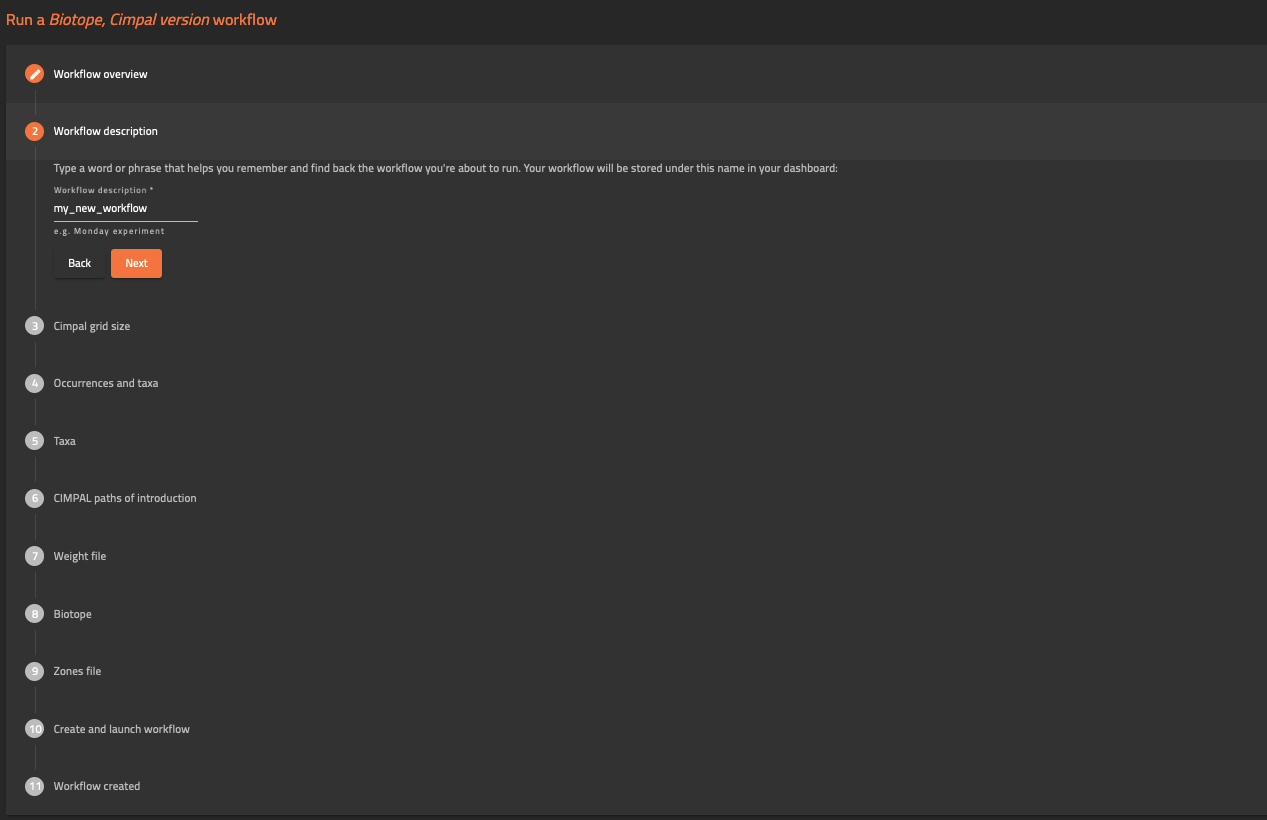
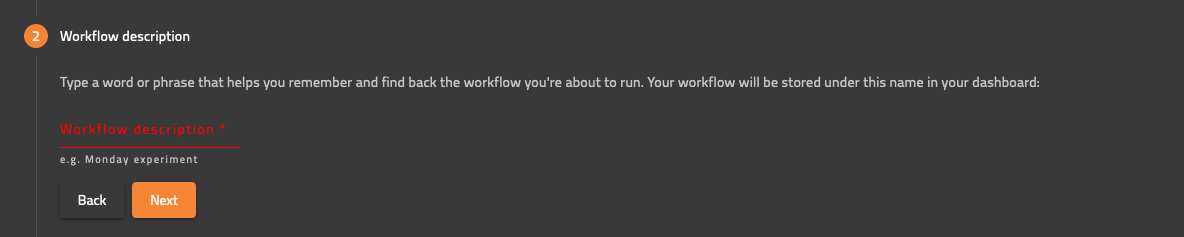
    Type a word or phrase that helps you remember and find back the workflow you are about to run. Your workflow will be stored under this name in your dashboard (Fig. 4).

    workflow description

    Fig. 4. Workflow description prompter.

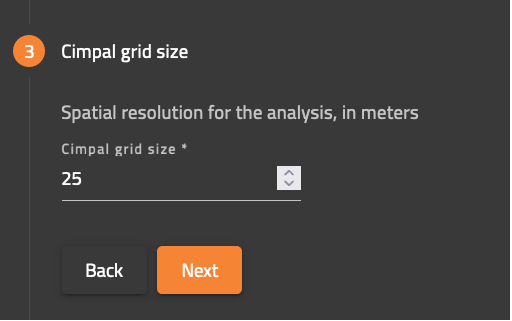
  • In this step, you will define the operational spatial resolution, in meters. The platform suggests a resolution of 25m, however you should manually set up the resolution and be able to move to the next step.

    ATTENTION: Higher resolutions will imply longer running periods. Be prepared to assume a trade-off between resolution and running periods. If not indicated, the default Grid size value is set to 25 m.

    cimpal grid size

    Fig. 5. Grid size

  • This is the Occurrences Dataset Uploader. This service allows you to upload the dataset of species occurrences that you have ‘manually’ prepared (via your own extractor or ‘personal’ database).

    The input is a .txt file with TSV (tab separated values) with up to 6 columns, and its first row should contain the following column headers:

    • decimalLatitude (numeric): the latitude of the observed specimen expressed in decimal degree in WGS 84 coordinate system (EPSG:4326) 
    • decimalLongitude (numeric): the longitude of the observed specimen expressed in decimal degree in WGS 84 coordinate system (EPSG:4326) 
    • scientificName (text): the scientific name of the species
    • year (numeric): the year of the observation
    ATTENTION: Make sure to remove the empty lines at the end of file. To upload this file into the platform you must first convert it to a .zip file.

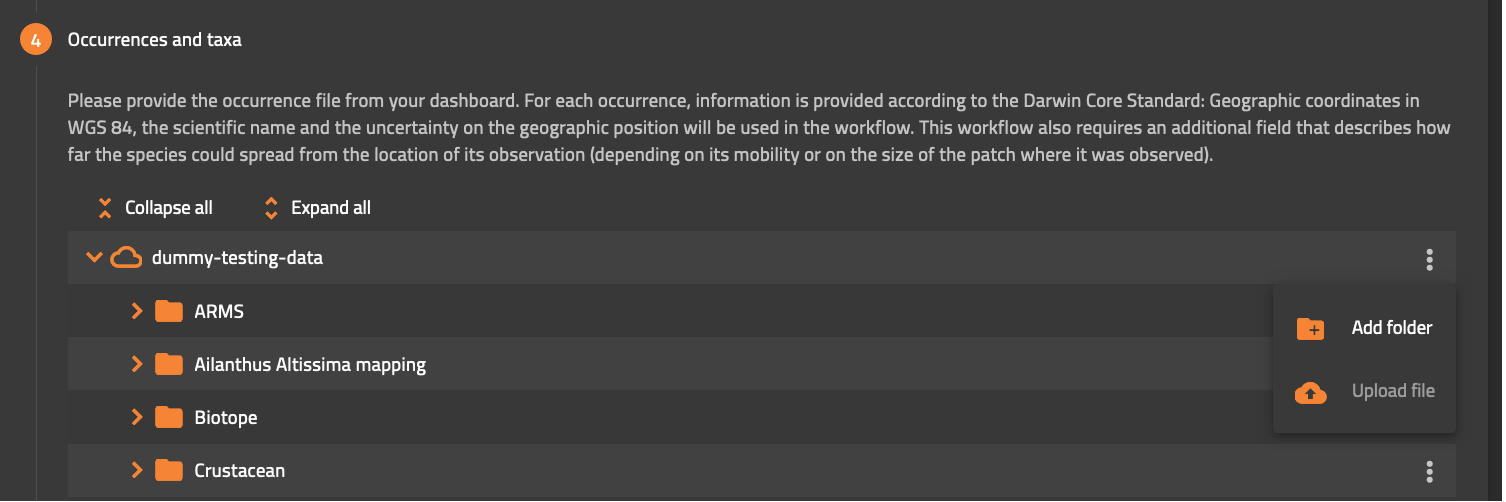
    To upload the .zip file with your dataset, press the three vertical dots at the end of the first line on the expanded file list, and choose ‘Upload file’ (Fig. 6). You can also create new folders to organize your files within the platform and upload your dataset within those new folders, using the ‘Add folder’ option.

    Occurrences Dataset Uploader

    Fig. 6. Occurrences Dataset Uploader

    After the upload is complete, you must select the file before advancing to the next step.

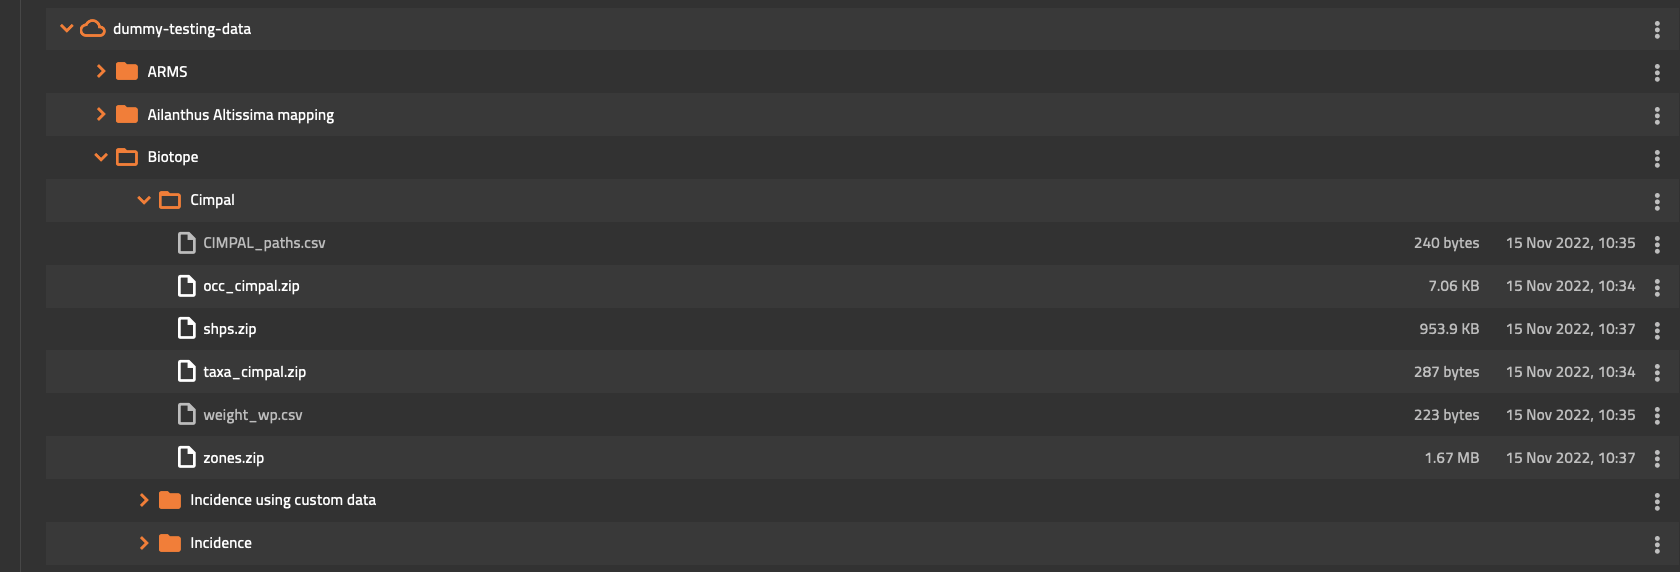
    Note: there is a set of dummy testing data (Fig. 7) that can be used to test the workflow. If that is the case, you should use the files available within the respective folder, and, for this step, the file is named occ_cimpal.zip, as shown in Fig. 7.

    dummy data

    Fig. 7. Dummy testing data, available to test the Biotope - CIMPAL version workflow

  • The Alien Taxonomy Dataset Uploader will allow you to define which species are native or not, by uploading the list of alien species scientific names ‘manually’ prepared (via your own extractor or ‘personal’ database). 

    The input is a .txt file with TSV (tab separated values) with 2 columns, and its first row contains the headers:

    • scientificName (text): the scientific name of the alien species
    • dispersionRadius (numeric): a species potential daily range (as an individual trait, not an observation property), expressed in meter. A default value of 50 meters is used if the field is not provided.
    ATTENTION: Make sure to remove the empty lines at the end of file. To upload this file into the platform you must first convert it to a .zip file.

    To upload the .zip file with your dataset, press the three vertical dots at the end of the first line on the expanded file list, and choose ‘Upload file’ (e.g., Fig. 5). After the upload is complete, you must select the file before advancing to the next step. Dummy testing data is also available (taxa_cimpal.zip).

  • In this step you will inform on the paths of introduction for each NIS taxa. A binary value (O or 1) indicates whether there a is possibility to introduce the taxa via the pathway in a .csv file (Fig. 8). One output will be created for each of the pathways in the file.

    You must upload a file with .csv extension with TSV. The possible pathways or vectors of introduction (the categories <path?> are defined by the user and may follow international CBD criteria) will be defined for each alien species. More than one pathway is allowed per species. The input is a .csv file in a matrix format with the first column listing the pathways of introduction categories and the subsequent n columns headers (first row) being the alien species scientific names <scientificName1>, which must match the names in the input file used in Alien Taxonomy Dataset Uploader (field scientificName):

    • row names (column 1) (text):“SpSciName”; “ALL”; <path1>; <path2>; <path3>; …
    • column headers (column 2 to n+1) (text): <scientificNameA>; <scientificNameB>; <scientificNameC>; ...
    • (matrix cells) binary value (0/1) (integer): indicates if the pathway of introduction applies (1) or not (0) to a given alien species. In row ‘ALL’ always indicate (1): this will allow you to generate the cumulative CIMPAL index for all species, not filtered by pathway of introduction.  

    dummy structure CIMPAL_paths

    Fig. 8. Structure of the CIMPAL_paths.csv matrix dummy file, as general example on how to present the CIMPAL paths of introduction.

    To upload the .csv file with your matrix, press the three vertical dots at the end of the first line on the expanded file list, and choose ‘Upload file’ (e.g., Fig. 7). After the upload is complete, you must select the file before advancing to the next step. Dummy testing data is also available (CIMPAL_paths.csv, shown in Fig. 8).

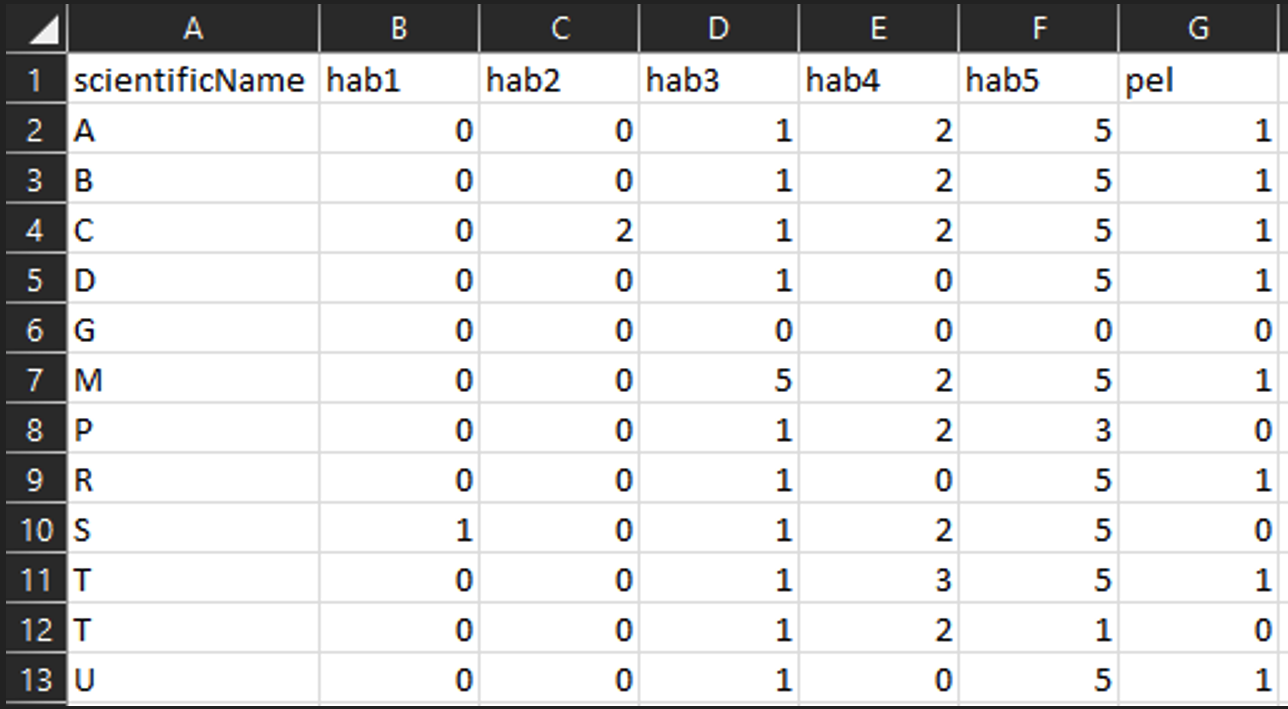
  • The weight file is the key of the CIMPAL analysis. This matrix (provided as a csv file) assigns a value of impact for each taxon inside each biotope. It links a species impact to a given biotope using predefined weights (defined by the user’s choice of impact assessment framework 1 ). A species can impact multiple biotope categories with different impact weights. If available, the strength of evidence 2 of each specific species-biotope impact weight can be accounted for, which will allow to calculate an "uncertainty averse” 2 version of the CIMPAL index, otherwise a "precautionary" version is calculated.

    The input must be a file with .csv extension (with TSV) in a matrix format (e.g., Fig. 9) with the first column listing the alien species names scientificName and the subsequent n columns’ headers (first row) being the n habitat names <habitatname>. These names must correspond to the names of each spatial layer uploaded in the next step (7 – Biotopes) and must be written in lower case. The cells in the matrix correspond to the value of the Magnitude of Impact (MoI):

    • (column 1) scientificName (text): the scientific name of the alien species must match the names in the input file used in Alien Taxonomy Dataset Uploader (field scientificName)
    • (row 1, column 2 to n+1) <habitatname> (text): the habitat names (lower case) must match spatial layers habitat names in input files Biotopes.zip (<habitatname>)
    • (matrix cells) (integer): score of the Magnitude of Impact (MoI) of each species in each habitat, according to the scoring protocol adopted by the user (more info in e.g., Katsanevakis et al. 2016 1).

    To upload the .csv file with your matrix, press the three vertical dots at the end of the first line on the expanded file list, and choose ‘Upload file’ (e.g., Fig. 7). After the upload is complete, you must select the file before advancing to the next step. Dummy testing data is also available (weight_wp.csv, shown in Fig. 9).

    dummy weight

    Fig. 9 Structure of a weight_wp.csv dummy file, as general example on how to present the CIMPAL weights for each species.

    Note: Please run several workflows if you need different weights for the same taxa; to calculate different versions of the CIMPAL, the workflow needs to be re-run with a new weight matrix.


  • In this step, you will provide the spatial layers for each habitat.

    The polygon dataset must contain one or more shapefiles that delineate the biotopes used in the weight file to determine the impact of each NIS in a particular place. Each file should be named as single_<habitatname>.shp (write all habitat names in lower case). Alternatively, a file with multiple biotopes (in which case the name of each biotope is stored in a field called "Habitat"), such as those provided by e.g. EUNIS, EMODNET, Corine, Copernicus, could be used.

    Please make sure that the names in the shape file match the names in the weight file (e.g., Fig. 8). Project the habitat shapefiles in LAEA (EPSG:3035) .

    All files must be provided as a single .zip file. After the upload is complete, you must select the file before advancing to the next step. Dummy testing data is also available (shps.zip).

  • Here, you can import any ecological zonation or administrative boundaries to extract spatial statistics out of the CIMPAL analysis. This data needs to be uploaded in your dashboard as a polygon shapefile.

    The input file(s) must be in .shp format that represent the spatial layer(s) for aggregating results at different scales or criteria (e.g., MSFD marine regions, countries, EEZ, EEA 10*10 km grid, any other resolution grid, or even the habitat categories used in previous steps (after some change to the input file – see below!).

    The zone shapefile must be in LAEA (EPSG:3035), and it must also contain a numeric field named "id_habitat" identifying each zone (unique zone code 1 to n). To upload this file into the platform you must first convert it to a .zip file.

    After the upload is complete, you must select the file before advancing to the next step. Dummy testing data is also available (zones.zip).

  • This is the final step of the Biotope vulnerability Workflow within the Internal Joint Initiative. Two options are available (Fig. 10):

    1.  Save the workflow’ which allows you to save for further modification;
    2.  ‘Save and launch the workflow’, which gives the instruction to the server to start computing CIMPAL with the provided data.

    create and launch the workflow

    Fig. 10. Create and launch workflow selection.

    Once you created your workflow, you can decide to run a new workflow or to visualize your Dashboard (Fig. 10).

    workflow created

    Fig. 11. Confirmation panel.

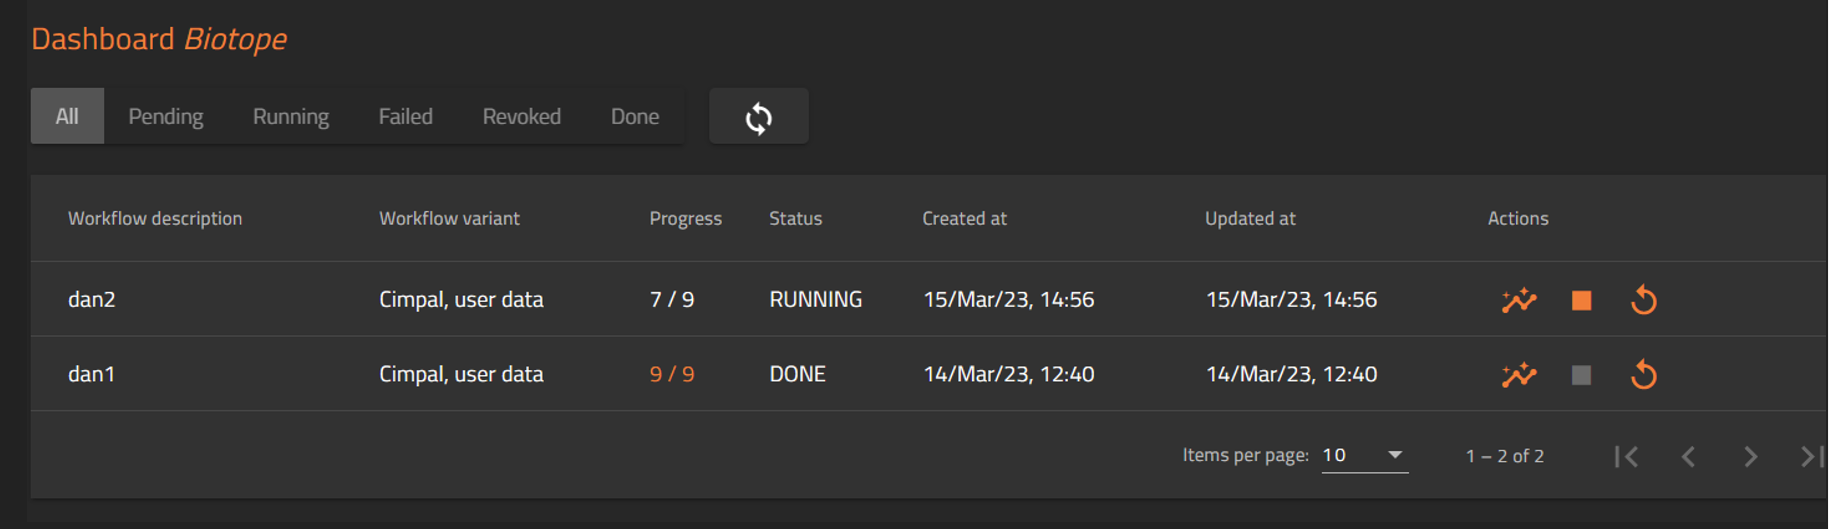
  • In your Dashboard (Fig. 12) you can find all your workflows and their status. More detail can be found under the Actions column, by pressing the Detailed information icon (Fig. 13), which will route you to the workflow insight.

    dashboard biotope cimpal

    Fig. 12. Dashboard for the Biotope workflow

    icon

    Fig. 13. Detailed information icon

    ATTENTION:
    1. The running time is highly dependent on the resolution defined in the Grid size value, on the number of species and on the size area of the assessment. As reference, running a dataset with 64 IAS for all Mediterranean sea, at a 100 m resolution, could take as much as 18 hours to complete. If not indicated, the default Grid size value is set to 25 m.

    Workflow insight

    Here you will find four panels:

    1. General information will include several information regarding the workflow;
    2. Workflow status diagram gives you a visual depiction of the status of the workflow and individual services;
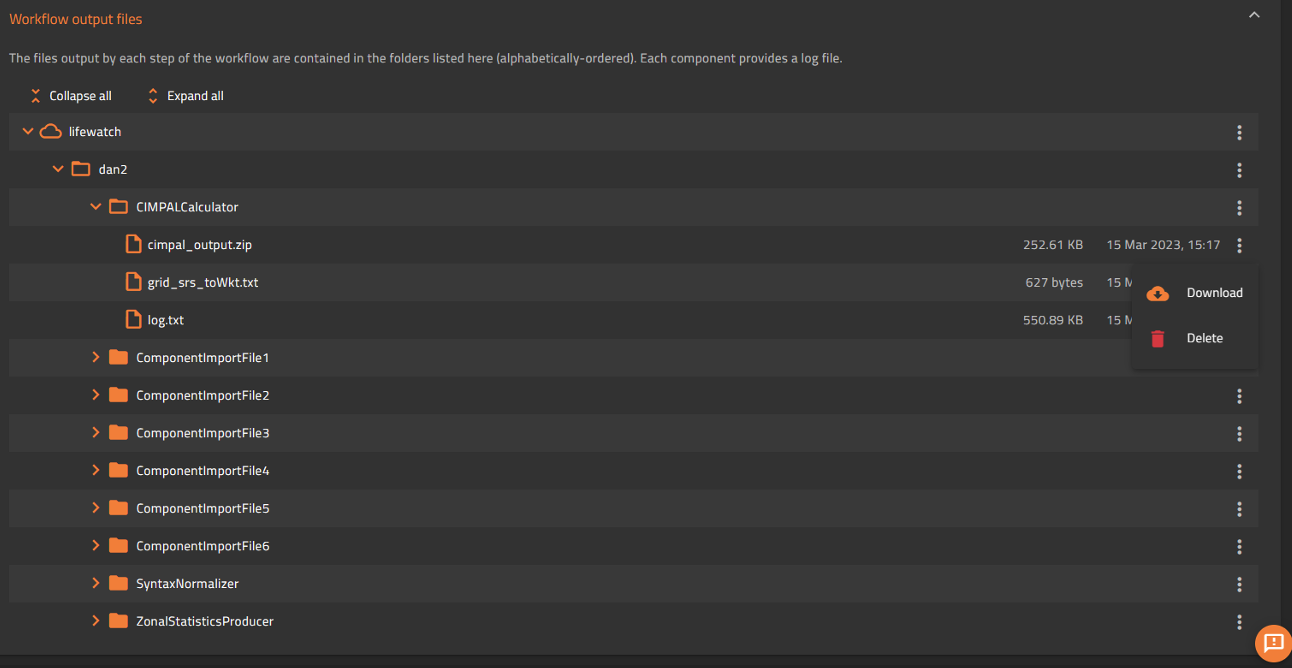
    3. Workflow output files (Fig. 13), where you can find the individual outputs for each component of the workflow, as well as their log files. This panel allows you to retrieve the results for all calculations:
      • Within the ‘CIMPALCalculator’ folder you will find ‘cimpal_output.zip’ which includes the individual raster outputs with the CIMPAL value for each species and path of introduction. The overall CIMPAL raster file will include ‘_ALL_’ in the name (e.g. cimpal_ALL_Weights_Precautionary.tif). The files should be downloaded to your local file, extracted and opened with a GIS software (e.g. QGIS)
      • Within the ‘ZonalStatisticProducer’ folder you will find individual (species and path of introduction) .csv files with the statistics of CIMPAL for each zone previously defined. The overall CIMPAL statistics file will include ‘_ALL_’ in the name (e.g. cimpal_ALL_Weights_Precautionary_stat.csv). The files can be open in any text or spreadsheet software.
      To access each file, press the three vertical dots at the end of the respective line on the expanded file list, and choose ‘Download’ as, shown in Fig. 14;

    output file panel

    Fig. 14. Workflow output files panel, where the user can access the final results, as well as the individual outputs for each component of the workflow.

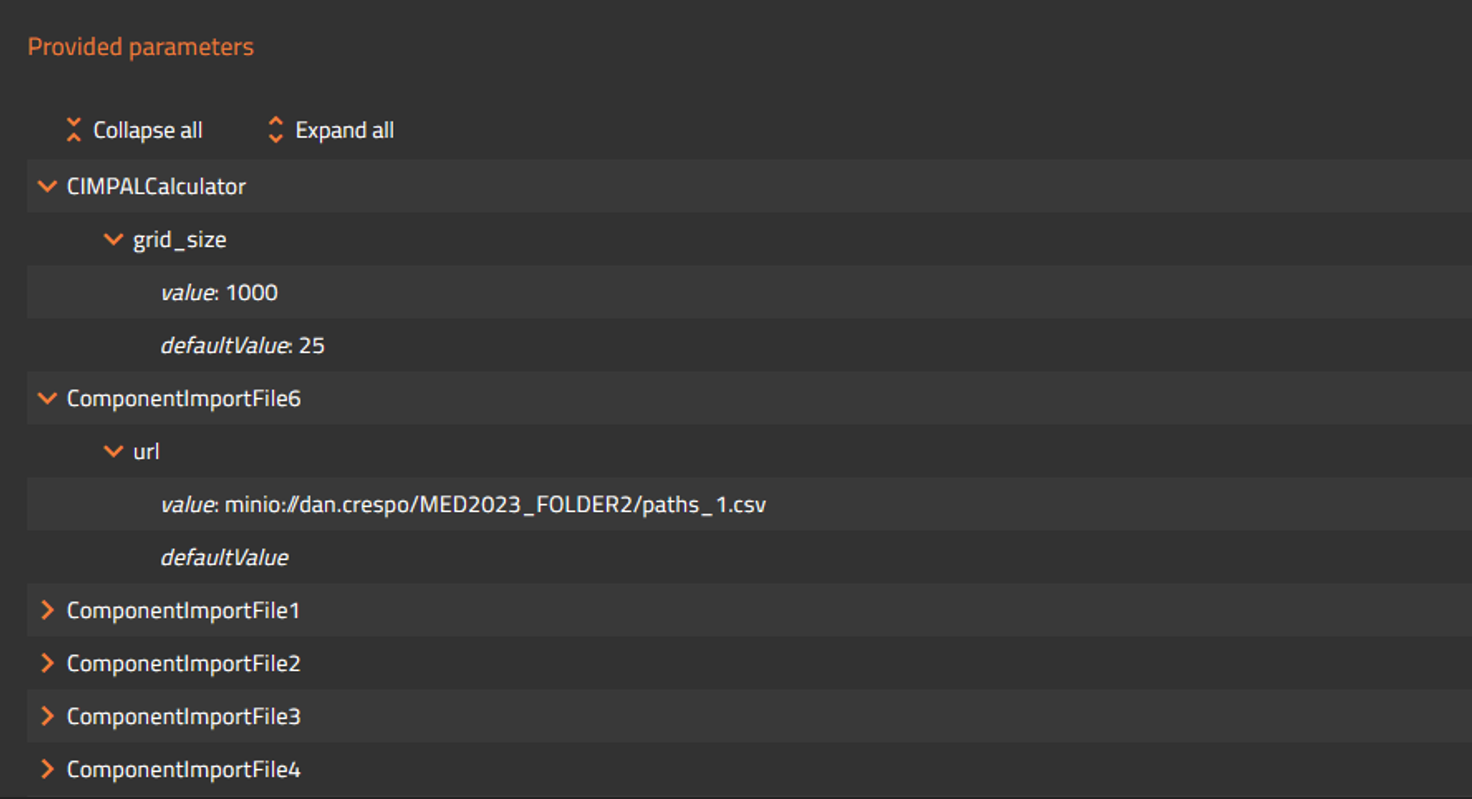
    4. Provided parameters (Fig. 15)  identifies the parameters and the paths to the input files in each component.

    parameters panel

    Fig. 15. Provided parameters panel, where the user can identify the input parameters and files used in each component/step.